Showing posts with label Tips&Tricks. Show all posts

Have you ever noticed an asterisk (*) before the name of a view in the desktop version of MylifeOrganized ? This small symbol serves as a he...


Have you ever noticed an asterisk (*) before the name of a view in the desktop version of MylifeOrganized? This small symbol serves as a helpful indicator that your current view has been modified but not yet saved.


When the asterisk appears

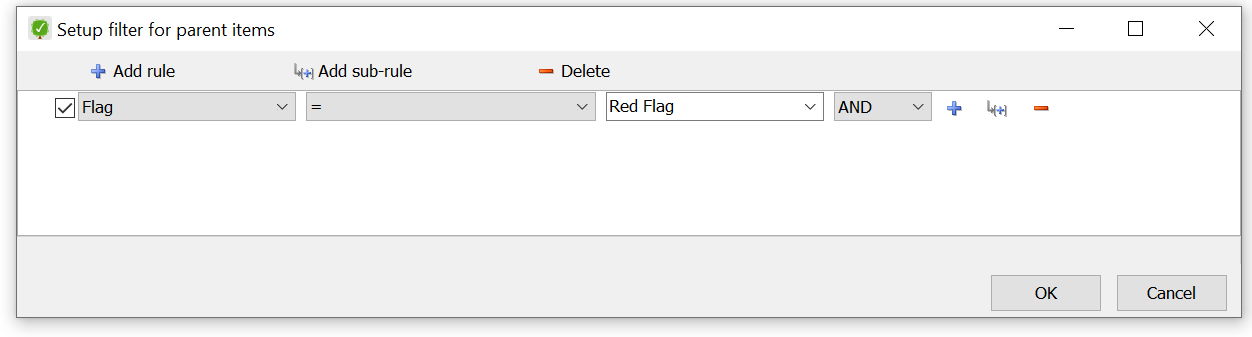
For example, you might open the built-in "Starred" view, and customize it to fit your needs: hide completed tasks, apply sorting or set other filters. These adjustments change the view from its original state, and the asterisk signals that you're now looking at a modified version of the base view.

Retained in the workspace, but not saved in the view

It’s worth noting that unsaved changes are retained within the workspace (tab) where you're working. "Retained" in this case means that even if you close MyLifeOrganized or your computer, the changes will still be there when you reopen the app. This feature is especially useful for experimenting with different view configurations without committing to permanent changes.


However, the changes are still not saved for the view, and if you close the current workspace, the customization will be lost. In other words, if you're satisfied with the changes you've made, you can save it as a new view under a unique name. And if you want multiple versions you should save them all, with slightly different but meaningful names.

Note. If you are in a workspace that contains retained unsaved changes and you hit the [+] tab to create a new workspace, the new workspace will inherit the retained unsaved changes from the workspace you came from.


Saving your view

To save your custom view, click "Save View As..." at the bottom of the "Filter" panel. You can then give the view a unique name for easy identification. After saving, the asterisk will disappear.


Once the view is saved, it will be added to the list of views and you will be able to open it in your tabs.


Note. MLO has several built-in views that cannot be saved under the same name after modification. You must enter another unique name for the new view.


Discarding Changes

On the other hand, there may be times when you don’t want to keep the changes.


A common scenario: you notice that your view isn’t displaying tasks as expected. This could be because you accidentally applied filters or made other modifications and forgot about them. The asterisk in this case is a useful indicator, showing that the view you're seeing has been altered.


If you've made changes that you don't want to keep, you can easily discard them. Simply click the "Discard Changes" link at the bottom of the "Filter" panel. This will revert the view to its last saved state.


Tip. Here you can learn more about the difference between view and tab in MLO.

Discover (or re-discover again?) the power of the classic, time-tested Getting Things Done (GTD) methodology with MyLifeOrganized. As one of...

Discover (or re-discover again?) the power of the classic, time-tested Getting Things Done (GTD) methodology with MyLifeOrganized. As one of our users, Mihail, recently shared:


To help you integrate GTD principles with MLO’s powerful features, we’ve created an easy-to-follow guide outlining the 5-stage process. To make it even easier, we've included a ready-to-use template that helps you set up a trusted system quickly. Just open the template, customize it to fit your unique needs, and create a reliable framework for managing your tasks — so you can focus on what truly matters.


Tip: Looking to connect with other MLO-GTD enthusiasts? Check out the discussion on our forum for valuable insights and sharing experiences.


If your workflow requires managing identical actions across multiple projects, you've likely pondered the optimal way to organize them w...


If your workflow requires managing identical actions across multiple projects, you've likely pondered the optimal way to organize them within the MyLifeOrganized to-do app. In this article, we've gathered key approaches to task organization based on insights from forums and your valuable feedback.


Each method has its advantages and disadvantages. While there is no one-size-fits-all solution, you can choose the method that best aligns with your accustomed workflow.


Scenario

Example: Onboarding New Employees.


Imagine an HR professional onboarding 10 new employees. While specific roles might have variations, most onboarding tasks are similar. Here's a sample project structure:


Project: Onboarding <Name>
Subtasks:

  • Send a welcome email
  • Schedule orientation session
  • Prepare onboarding documents
  • Assign a mentor
  • Set up a new employee's computer
  • Provide onboarding training
  • Conduct a follow-up meeting
  • ... and so on


Solutions

Option 1. Create 10 projects and duplicate subtasks in each of them.


Tip: Instead of regular duplication, use the "Create from template." feature. It adjusts task dates dynamically, maintaining scheduled intervals.

Pros: 

  • Manage each project separately.
  • Simple workflow without additional complexity.
  • Track progress per person (enable 'Project completion' column).


Tip: Sequential task execution? Enable 'Subtasks in order' to keep your To-Do list concise.

Cons:

  • If the overall work structure changes, the updates should be made in all 10 projects.
  • Some tasks are performed in a bunch for several projects at once, and it is necessary to mark tasks completed in 10 different projects.


Tip: To see the task for all projects at once, use the text filter. As a result, all projects that have this task will be displayed (because the task names are the same for all projects).


  • The views don't exactly display tasks nicely ('Send a welcome email' - who does it belong to?).


Tip:This can be solved by enabling project display in the settings:
On desktop: Tools > options > To-Do List format > Encode project name.
On mobile: Settings >Appearance >Props line > Date+Project.


Option 2: Create a list of actions with each person's name as subtasks.


Pros:

  • Efficient batch processing. You can complete a task for all employees simultaneously if your workflow allows it.


Cons:

  • Managing a large volume of tasks may lead to clutter within the list.
  • There are still issues like displaying tasks in views without a parent.


Tip: Consider turning tasks into projects. This will let you see which task a person belongs to (as mentioned above).

  • You can't see the progress of an individual employee.


Option 3. Create task list with contexts as employee names

How it works: 

When a task for a person is completed, remove their corresponding context.


Tip: Use the keyboard shortcut "Alt + L" to quickly check or uncheck multiple contexts (employees) at once.

Complete tasks when they no longer have any assigned contexts.

Pros:

  • Flexible task structure adaptable to changing needs.
  • Allows easy filtering of tasks by person using contexts.
  • Batch actions for multiple employees.
  • The “Active by Context” view provides a clear overview of remaining tasks for each person.


Cons:

  • Removing contexts may be less intuitive compared to ticking checkboxes in standard checklists, requiring frequent context and filter adjustments.
  • May not visually represent the onboarding process flow.


Option 4. Use contexts as an action.

How it Works:

  • Create separate projects for each person being onboarded.
  • Define contexts as the different stages of the onboarding process
  • Assign relevant contexts to each onboarding task.


Contexts in this setup represent the current action required for the person. In the "Active by Context" view, you can drag and drop tasks between different actions.

Tip: Put a number before each context (e.g., '1. Send a welcome email', '2. Schedule orientation session') to have them sorted as expected.


Alternative Option: Contexts as a Checklist

You may also like to use contexts like a checklist:

1. Assign all onboarding task-related contexts to each employee project.
2. Use the keyboard shortcut "Alt + L" to quickly check or uncheck multiple contexts (task stages) for an employee.
3. Unchecked contexts represent completed tasks, while checked contexts indicate what's left to do.
4. When a new onboarding task arises, create a new context and assign it to all relevant employee projects.


Tip: Assign the same hotkey to all onboarding-related contexts to create a compact mini-list of contexts to choose from (see the screenshot below).


In the task note, you can add registration data, and other relevant information, keeping everything at hand.


Pros:

  • Batch actions for multiple employees.
  • Easy to filter tasks. The "Active by Context" view shows which tasks remain for each person.
  • Flexible Workflow: Easily add, update, or remove contexts (stages) as your onboarding process evolves.
  • Contexts allow you to add notes, set open/closed hours, and include them in groups.


Tip: Here you can learn more about contexts.

Cons:

  • It may be unusual and uncomfortable to work with contexts and filters instead of ticking task checkboxes.
  • Not suitable for managing dependencies between tasks.


Summary

We've explored four methods for organizing projects with similar tasks in MLO. Probably, most of our users prefer the first solution due to its simplicity and clear separation, allowing for straightforward progress tracking per project. However, it does require more maintenance when structural changes occur. On the other hand, the fourth solution is good for advanced users who are comfortable with contexts and filters. This method offers flexibility and efficiency by enabling batch actions and easy adaptation to evolving workflows.

We hope these methods help you find the best way to organize your tasks in MLO. Share your experiences and let us know what works best for you!

Even if there's no predefined setting for a specific scenario in the to-do app MyLifeOrganized, you can often create an effective worka...

Even if there's no predefined setting for a specific scenario in the to-do app MyLifeOrganized, you can often create an effective workaround. Here's an example from a forum question.


Question: I have a task that I want to perform 2x per week, but only between May and October. I want this task to repeat yearly. I can't figure out ho to configure this task in the recurrence window.

Solution: There isn't a built-in feature for setting up such a yearly recurrence in MLO, but you can create the following workaround:

1. Set Weekly recurrence for your task:


  • Set the task to recur weekly on the specific days (e.g., Monday and Friday).
  • Set the start and due dates for the upcoming occurrence.


2. Set 'End date' to the last day you plan to perform this task in October (see the screenshot)

3. Create a parent task for this recurring task and name it something like "Set up recurring task for next year."

How it works: Every week, the task will appear on your To-Do list twice. When you complete the last occurrence in October, the recurring task will mark itself as complete. At that point, the parent task will become active, reminding you to reschedule the recurring task for the next year.

Do you have creative workarounds for managing tasks in MLO? Share them in the comments!

Question : Is it possible to display subtasks from projects, when only the top level items are flagged? I want to avoid having to flag each ...


Question: Is it possible to display subtasks from projects, when only the top level items are flagged? I want to avoid having to flag each individual step under the project, in order to get it to show up in the view.

Challenge:  Enabling the normal flag filter may seem like a solution. But here's the catch:

  • Cluttered View: It shows all flagged tasks, not just those within your projects.
  • Subtasks not displayed: It doesn't display unflagged subtasks in flagged projects, requiring you to flag each one manually – a time-consuming hassle.


Solution: Hierarchy Filters to the rescue!

MyLifeOrganized personal task manager offers robust hierarchy filtering options that allow you to display tasks based on the parent or child task's status. There are several ways to achieve what we need.


Option 1. Using Child Items filter


1. In the filter by Flag, tick the required flag.
2. Open the view "All Tasks"
3. In the General section click "Config":


4. Click ‘Include child items’’


This will display all subtasks from projects where the top-level task is flagged. However, this view shows individual flagged tasks as well.


To avoid cluttering the view, use option 2.


Option 2. Using Parent Items filter

1. Discard any changes to the view to start from scratch.


2. In the Filter pane, open “General” and  click "Config".
3. Click 'Set parent filter'
4. Add your filter by flag.


5. Click Ok.

This should display exactly what you need:


Result: The view displays all levels of subtasks within projects where the top-level tasks are flagged, providing a clear and concise view.

Our brain is an amazingly intelligent tool capable of rationally prioritizing tasks. However, even the most organized of us sometimes get bo...


Our brain is an amazingly intelligent tool capable of rationally prioritizing tasks. However, even the most organized of us sometimes get bogged down in the details. The built-in smart to-do list system in MyLifeOrganized can be your great assistant, calculating priorities for you. Let's see how it works.


Importance in MyLifeOrganized

The concept of importance is familiar to most people from the Eisenhower Matrix, where all tasks are divided into important and urgent. When applied to simple linear lists, this approach can be used and it will show correct results.


But what if there are many projects with subtasks, goals, recurring and one-time tasks? When all this is structured in a task tree with unlimited levels of nesting?

In this case, an effective way to determine priority tasks can be the approach used in the task management app for Windows.

The essence of this approach is that the importance of each task is determined directly for the "parent" task, project, or folder in which this task is located. In the case of using a large number of nesting levels, the importance for the final task, like a snowball, either accumulates or decreases along the chain. See the example below.

Suppose, we have a project called "Mountain Trip". In order to go on this trip, we need to buy tickets, get insurance, and pack our things. At this level, the most important task will be to buy tickets.

The task "Packing" will have the lowest priority. This is not because we don't need to pack our things. It's because even if we forget something, the trip will still happen.

However, “Packing” can have a subtask with the highest priority. For example, "Take glasses" is really important if you have poor eyesight and can't see without glasses.


If we switch to the To-Do tab, we will see the tasks in this order:

  • "Book tickets" is at the top of the list because the task itself has a max priority + its parent has a high priority.
  • Next come tasks from the "Bookings & Documents" branch, which have normal priority, but the parent task has a high priority.
  • then the important task "Take glasses" from the not so important task branch "Packing".
  • and so on.
     

As you can see, the importance property affects the order in which the task will be displayed in To-Do. This way you can see which task needs to be done first.


Tip. To set a round value for importance/urgency in the app for Windows, activate the slider and press 1, 2, 3, 4, or 5 on the keyboard, which corresponds to the values 0, 50, 100, 150, and 200. 

Alternatively: Right-click on the slider and select a value from the drop-down list.


Other factors that affect priority

The overall priority of a task depends on many factors, such as Weekly Goal, Due and Start dates, Importance, and Urgency. Among these parameters, Importance takes the leading position.


In the menu Tools -> Options, you can find settings to set the influence of Weekly Goal, Due and Start dates, Importance, and Urgency factors individually. The higher you set the weight of the dates factors, the more the dates will affect the ordering of the list.


Give it a try and keep in mind that the key to high productivity is to consistently focus on your priority tasks.

Sometimes our to-do lists can feel overwhelming. But what if the key to increased productivity wasn't just about adding tasks, but also ...


Sometimes our to-do lists can feel overwhelming. But what if the key to increased productivity wasn't just about adding tasks, but also about strategically removing them?  Recently, one of our amazing users, João, shared a valuable tip on LinkedIn:  decide not only what you'll do today, but also what you definitely won't do.


How to "Not Do" a Task in MLO

MLO offers several ways to remove tasks from your immediate to-do list while keeping them on your radar:

  • Schedule for Later.

    Use the "start date" feature (check out our Getting Started Guide for details) to move tasks to tomorrow, next week, or a specific date in the future. This removes them from your current view but ensures they don't get forgotten.

  • Set Dependencies.

    Certain tasks might rely on completing others first. Use the Dependency feature to link tasks, automatically hiding dependent tasks in To-Do until their prerequisites are finished.

  • Closed Hours of contexts.

    Need to focus on a specific type of tasks but keep getting distracted by other tasks? Create a context with "closed hours" to temporarily hide irrelevant tasks until you're ready for them.

  • The "Someday" Folder.

    You can create a "Someday/Maybe" folder to keep ideas and aspirations at hand without cluttering your daily to-do list. Just hide that folder in your to-do view, as described in this Twitter post. Review your "Someday/Maybe" list during your weekly planning to assess what tasks are still relevant.

  • A tip from Andriy, our CEO.

    You may also like the method from Andriy how to postpone a task for a while.


By using these MLO features, you can create a more focused and manageable to-do list, allowing you to prioritize what truly matters each day.

When managing tasks, it's crucial to ensure that all relevant details are assigned and nothing falls through the cracks. Checklist is a...


When managing tasks, it's crucial to ensure that all relevant details are assigned and nothing falls through the cracks. Checklist is a good tool for achieving this level of organization in the task manager MyLifeOrganized.


A checklist helps to make sure that:

  • all delegated tasks have a due date
  • all active tasks have context
  • all big tasks are broken down into next actions.
  • etc.


To implement this approach, consider creating views that check tasks based on different conditions. For instance, the following view displays tasks flagged 'Delegated' that are missing a due date:


Once the due date is assigned, the list automatically clears in this view, providing a visual cue that nothing has been overlooked.


How to set up the view

For the view from our example, you need to enable in the settings:

1. Filter by the flag "Delegated"
2. Additional filter: Due Date does not exist


For added convenience, consider enabling a counter for this view, counting all tasks with subtasks but without folders.


Tip. You can also add the "Control" tab, as illustrated above. In this tab, it is convenient to switch between control-related views. Activate the Show counter option for this tab, providing a quick overview of tasks requiring attention.


By following these steps, you'll streamline your planning process and ensure that no task slips through the cracks. Enjoy the peace of mind that comes with a well-organized and comprehensive task management system!

You can give your task tree a personal touch by changing standard ‘folder’ icons. With automatic formatting in MyLifeOrganized, you can vis...

You can give your task tree a personal touch by changing standard ‘folder’ icons. With automatic formatting in MyLifeOrganized, you can visually separate tasks from different areas of life like this:


Quick setup

To quickly apply the autoformatting from our example to your folders just import them in your task planner for Windows:

Step 1: Download our pre-made autoformatting rules from this link.


Step 2: Import the rules by navigating to Tools  Options  Automatic Formatting  Import


Step 3: Adjust the autoformatting rules to match your folder names.

Step 4: Click Ok  


Voilà! Your folders are now more personalized with custom icons. 


Tip. You can import your own icons. To add icons, click Icon → Manage Icons → Add . The max size of an icon should be 72x72.


Note. Autoformatting is only available on desktop and cannot be synced to mobile. If you wish to see the same custom icons on both desktop and mobile, assign them to flags on desktop and sync to mobile  custom flags syncs perfectly with iOS and Android apps!

Question : I have a task that re-occurs every 4 days. Is there a way to set a reminder the day before each time and on the due date? ...

Question: I have a task that re-occurs every 4 days. Is there a way to set a reminder the day before each time and on the due date?


Solution: Reminder follows the recurrence pattern you set for the task. It works the same on desktop and mobile. It is most convenient to set it up on the desktop computer and synchronize the changes with the mobile app.


Adding a single reminder

For example, you set a recurrence every 4 days, starting tomorrow. For the reminder to go off the day before the recurrence, you need to set the reminder for today:


Tip: Enable "Next Alert Time" column to see when the next time the reminder will go off.


Once the reminder goes off, click to dismiss it. Tomorrow when you complete a task, you will see that the next reminder is updated to one day before the next occurrence.  


Adding a second reminder

There is no way to set multiple reminders for a task, but there is a workaround. You can add a subtask to the recurring task and set a reminder for it on the due date.

Also, for the parent recurring task enable "automatically recur when all subtasks are completed". Here is a screenshot of the settings:


The subtask is what you will see in To-Do. Once you complete it or its parent task, it will be switched to the next recurrence keeping the reminders: the first reminder one day before and the second on the due date.

Tip: Learn more about recurring tasks in task management app MyLifeOrganized


Question: How can I see only projects that have subtasks with due dates this week? Solution : A hierarchy filter comes in handy for this. ...


Question: How can I see only projects that have subtasks with due dates this week?


Solution: A hierarchy filter comes in handy for this. But how to use it?


Probably, your first thought would be to open the standard 'Projects' view and set a hierarchy filter for the child items. It seems logical, but in this case all(!) projects would be shown: projects that have the required subtasks, and projects that do not. In our case, we want to show only the projects with subtasks scheduled for this week.


How to set up

1. Use the main filter to find tasks that have a due date on or before this week.


2. Show parents for the tasks. Сlick "include parent items" in the hierarchy filter.


3. Since we need to show the subtasks of the projects only, we need to set the parent filter.


4. For the parent items we create the rule "This is a project".


Done! 
 
This way, only projects that have at least one subtask with a due date this week will be displayed.


Lean more about the hierarchy filter in the user's guide.

Question : Can I assign points to tasks? And see the total number of points earned for the day? This is needed to motivate you to meet all t...


Question: Can I assign points to tasks? And see the total number of points earned for the day? This is needed to motivate you to meet all the goals.

Solution: Instead of using points, you can use the effort field to track your progress.

How to set up

1. Create a project "Target for the day". 


Set the effort for it to 0. This is to ensure that the completion of the project itself is not counted in the project completion percentage. If the effort is set to 0 for the project, then progress will show 100% when all the subtasks are completed.

2. Add subtasks. For example, I plan 5 tasks for today:


  • Task 1: difficult, set effort to maximum.
  • Task 2: medium difficulty, normal effort
  • Task 3: medium difficulty, normal effort
  • Task 4: easy, less effort
  • Task 5: easy, less effort.


3. Enable the "Project Completion %" column.


The percentage of progress for the entire project is calculated upon completion of the subtasks.


4. You can also create a Trigger&Action, so that when the project is completed (i.e. when all targets for the day are met) an achievement message is shown:


Tip. You can find this option in Tools → Options → Triggers&Actions.

In the new version of our task manager for Windows we added a a simple solution for creating typical tasks. It allows you to create a task ...


In the new version of our task manager for Windows we added a a simple solution for creating typical tasks. It allows you to create a task or a whole project based on an existing branch. Unlike standard duplication, this functionality shifts dates to the actual ones, while keeping the intervals for the set dates. See the instructions on our website.


When you are working on lots of different things, it is nice to get an overview of everything you have to do. In the new version of our  to-...

When you are working on lots of different things, it is nice to get an overview of everything you have to do. In the new version of our to-do app for Windows it is possible to display multiple views in one window. Without constantly adjusting it after re-starting the app!


You can see the hierarchical Outline and simple To-Do side by side, drag&drop tasks from Inbox to where they should be in a hierarchy, track projects and see high-level goals, and more. Dashboards help you stay updated on what is happening in multiple views, and they are especially handy if you use multiple screens. 


How to create a Dashboard

To create a new dashboard go to menu View → New Dashboard:


A new dashboard opens in Edit mode. Here you can click to add more columns and rows and change the view displayed. 


In dashboards you can display any view from your list of views. If you need to add filters to tasks, hide/show completed tasks, you can do it in the main MLO window, save that view and the changes will be reflected in the view in the dashboard. 


Manage Dashboards

You can find all your dashboards in menu View → Manage dashboards. Click the ‘eye’ icon next to the dashboard(s) you want to open. 


Assign hotkey 

You can assign hotkeys to a dashboard to quickly open it.  


Tip. If you want your dashboards to open immediately when you start MLO, just don't close them when you exit the program. Close the program window.


Add new task

Use hotkeys if you need to add a new task (Ctrl N) and subtasks (Shift Ctrl N) in a view inside the dashboard.


Drag&Drop tasks between views

You would typically need it for moving tasks out of Inbox. Just select the tasks and drag&drop them to the required position in your list. 


Double-click to switch to the main window* 

 If you double-click a task in the dashboard, it will bring you to the main window where you can view and edit all its properties. 


*This feature is already implemented in the private beta, and will be available in the public version soon. 


Use cases

As with most other features in MLO, you can tweak and tune dashboards to what you need. We’ve collected some feedback to give you more ideas on how you can use dashboards:


Calendar Dashboard

Another use case shared by our user Andrei is the "Calendar dashboard." The idea is to display tasks for each day of the week in a column, like this:

Tip. If you want to add several columns full-height to a dashboard that already has rows, just create another dashboard and place next to the first one. 


Kanban board

You can also create a Kanban board using dashboards. They weren't designed for that, so this was a nice surprise to us from our beta testers!


No magic here though. You definitely need to take some time to set up the views you want to open in each column, but then the dashboard works pretty well. You can move tasks from one column to another by dragging & dropping them to the group name - the corresponding flag will be assigned automatically. 


Here is our example on how to manage the “Kitchen Project”. The view in the columns “ToDo”, “Doing” and “Waiting” shows tasks filtered by flag. “Done” shows completed tasks, and “Backlog” shows tasks that have no flag.


Tip. For your convenience, we've saved this configuration. You can download it, and import the views, flags and dashboard to your data file in MLO:

  • To import views right-click in the Views pane→ Import  Select the .mfv file. 
  • To import flags go to menu File → Import  Select the .xml file → Open → Select  'Flags'.
  • To import a dashboard go to menu File → Import Select the .xml file → Open → Select  'Dashboards'. 


Another example of using Kanban is managing the delegated tasks: the first view - John's tasks, second view - Mathew's tasks, etc.


Eisenhower matrix

Similarly, you can create a dashboard that displays the urgent-important matrix, four quadrants. This tool helps you divide your tasks into four categories: the tasks you'll do first, the tasks you'll schedule for later, the tasks you'll delegate, and the tasks you'll declutter.


In our example, we used the following filters:
  • Important are tasks with importance more than normal
  • Urgent are tasks with a due date tomorrow or before. 

Tip. For your convenience, we've saved this configuration. You can download it, and import the views and dashboard to your data file in MLO:

  • To import views right-click in the Views pane→ Import  Select the .mfv file. 
  • To import a dashboard go to menu File → Import → Select the .xml file → Open → Select  'Dashboards'. 

We are sure there are many other ways of using dashboards. Feel free to share your findings in the comments!